
When Windows 11 first came out, it was all about innovation, bringing major changes in design, performance, and security. These improvements made a huge difference in user experience, giving Windows all a fresh and modern feel.
But all that excitement can come crashing down when you try everything, and Windows 11 won’t activate. However, in this article, you’ll learn how to activate it using the Windows 11 Activator TXT command method. These steps are easy to follow and take just a minute, once you go through them properly, you’ll have Windows 11 up and running in no time!
Microsoft Windows 11 Activator TXT File - Free Download
Now, while you may come across various methods online claiming to activate Windows using a simple TXT file, it's important to understand how these activators work and the potential risks involved.

Essentially, a Windows activator TXT file contains a script that runs commands to bypass Microsoft’s activation process. These scripts typically rely on Key Management Service (KMS) activation, which is a legitimate technology used by enterprises to activate multiple devices under a single license. However, when used outside of a licensed corporate environment, these activators often fall into a gray area, potentially violating Microsoft’s terms of service.
Turn Off Windows Real Time Protection
Windows 11 treats certain TXT files as a threat, so you need to disable Windows Real-time Protection first. Here’s how:
Step 1: Open the Windows search bar in the taskbar, search for "Windows Security", and click on it to open.

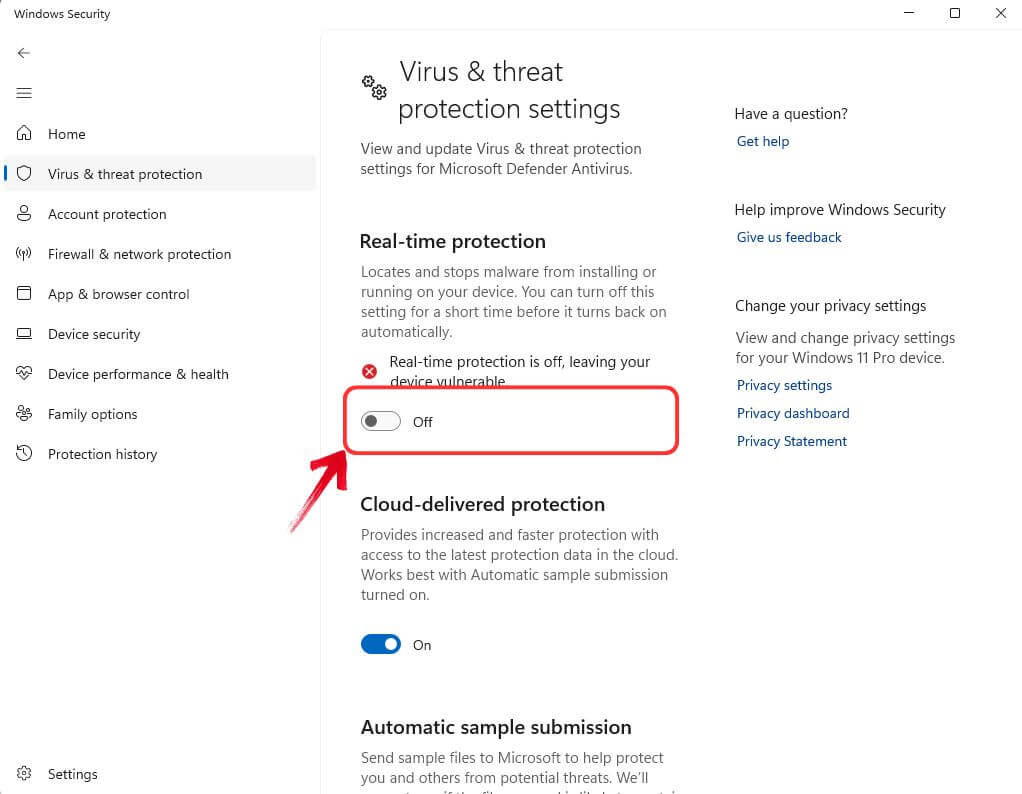
Step 2: In Windows Security, select the "Virus & threat protection" tab from the left pane, then click on the "Manage Settings" option within the "Virus & threat protection" section.

Step 3: Now, you can manage Windows Real-time Protection using the toggle. Switch the toggle to the "Off" position to temporarily disable it.
Create Windows 11 Activator Txt File
With Windows real-time protection turned off, we can now create or download the Windows 11 Activator TXT file by following these steps.
Step 1: To create the Windows 11 Activator TXT file, open a text editor like Notepad.
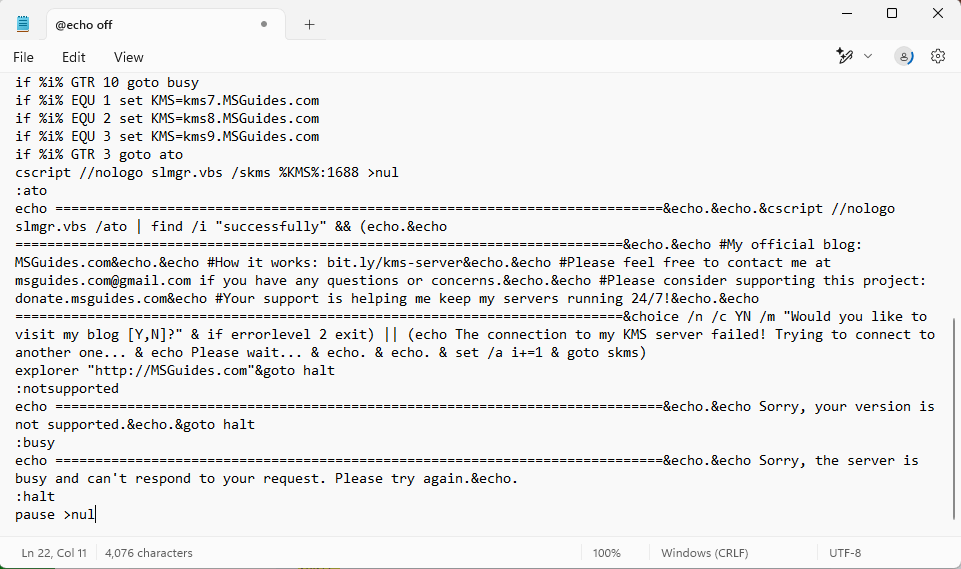
Step 2: Now, simply paste the following Windows 11 Activator script into the text editor.
@echo off
title Activate Windows 11 (ALL versions) for FREE - MSGuides.com&cls&echo =====================================================================================&echo #Project: Activating Microsoft software products for FREE without additional software&echo =====================================================================================&echo.&echo #Supported products:&echo - Windows 11 Home&echo - Windows 11 Professional&echo - Windows 11 Education&echo - Windows 11 Enterprise&echo.&echo.&echo ============================================================================&echo Activating your Windows...&cscript //nologo slmgr.vbs /ckms >nul&cscript //nologo slmgr.vbs /upk >nul&cscript //nologo slmgr.vbs /cpky >nul&set i=1&wmic os | findstr /I "enterprise" >nul
if %errorlevel% EQU 0 (cscript //nologo slmgr.vbs /ipk NPPR9-FWDCX-D2C8J-H872K-2YT43 >nul||cscript //nologo slmgr.vbs /ipk DPH2V-TTNVB-4X9Q3-TJR4H-KHJW4 >nul||cscript //nologo slmgr.vbs /ipk YYVX9-NTFWV-6MDM3-9PT4T-4M68B >nul||cscript //nologo slmgr.vbs /ipk 44RPN-FTY23-9VTTB-MP9BX-T84FV >nul||cscript //nologo slmgr.vbs /ipk WNMTR-4C88C-JK8YV-HQ7T2-76DF9 >nul||cscript //nologo slmgr.vbs /ipk 2F77B-TNFGY-69QQF-B8YKP-D69TJ >nul||cscript //nologo slmgr.vbs /ipk DCPHK-NFMTC-H88MJ-PFHPY-QJ4BJ >nul||cscript //nologo slmgr.vbs /ipk QFFDN-GRT3P-VKWWX-X7T3R-8B639 >nul||cscript //nologo slmgr.vbs /ipk M7XTQ-FN8P6-TTKYV-9D4CC-J462D >nul||cscript //nologo slmgr.vbs /ipk 92NFX-8DJQP-P6BBQ-THF9C-7CG2H >nul&goto skms) else wmic os | findstr /I "home" >nul
if %errorlevel% EQU 0 (cscript //nologo slmgr.vbs /ipk TX9XD-98N7V-6WMQ6-BX7FG-H8Q99 >nul||cscript //nologo slmgr.vbs /ipk 3KHY7-WNT83-DGQKR-F7HPR-844BM >nul||cscript //nologo slmgr.vbs /ipk 7HNRX-D7KGG-3K4RQ-4WPJ4-YTDFH >nul||cscript //nologo slmgr.vbs /ipk PVMJN-6DFY6-9CCP6-7BKTT-D3WVR >nul&goto skms) else wmic os | findstr /I "education" >nul
if %errorlevel% EQU 0 (cscript //nologo slmgr.vbs /ipk NW6C2-QMPVW-D7KKK-3GKT6-VCFB2 >nul||cscript //nologo slmgr.vbs /ipk 2WH4N-8QGBV-H22JP-CT43Q-MDWWJ >nul&goto skms) else wmic os | findstr /I "11 pro" >nul
if %errorlevel% EQU 0 (cscript //nologo slmgr.vbs /ipk W269N-WFGWX-YVC9B-4J6C9-T83GX >nul||cscript //nologo slmgr.vbs /ipk MH37W-N47XK-V7XM9-C7227-GCQG9 >nul||cscript //nologo slmgr.vbs /ipk NRG8B-VKK3Q-CXVCJ-9G2XF-6Q84J >nul||cscript //nologo slmgr.vbs /ipk 9FNHH-K3HBT-3W4TD-6383H-6XYWF >nul||cscript //nologo slmgr.vbs /ipk 6TP4R-GNPTD-KYYHQ-7B7DP-J447Y >nul||cscript //nologo slmgr.vbs /ipk YVWGF-BXNMC-HTQYQ-CPQ99-66QFC >nul&goto skms) else (goto notsupported)
:skms
if %i% GTR 10 goto busy
if %i% EQU 1 set KMS=kms7.MSGuides.com
if %i% EQU 2 set KMS=kms8.MSGuides.com
if %i% EQU 3 set KMS=kms9.MSGuides.com
if %i% GTR 3 goto ato
cscript //nologo slmgr.vbs /skms %KMS%:1688 >nul
:ato
echo ============================================================================&echo.&echo.&cscript //nologo slmgr.vbs /ato | find /i "successfully" && (echo.&echo ============================================================================&echo.&echo #My official blog: MSGuides.com&echo.&echo #How it works: bit.ly/kms-server&echo.&echo #Please feel free to contact me at [email protected] if you have any questions or concerns.&echo.&echo #Please consider supporting this project: donate.msguides.com&echo #Your support is helping me keep my servers running 24/7!&echo.&echo ============================================================================&choice /n /c YN /m "Would you like to visit my blog [Y,N]?" & if errorlevel 2 exit) || (echo The connection to my KMS server failed! Trying to connect to another one... & echo Please wait... & echo. & echo. & set /a i+=1 & goto skms)
explorer "http://MSGuides.com"&goto halt
:notsupported
echo ============================================================================&echo.&echo Sorry, your version is not supported.&echo.&goto halt
:busy
echo ============================================================================&echo.&echo Sorry, the server is busy and can't respond to your request. Please try again.&echo.
:halt
pause >nul
Step 3: To save the script, click on the "File" menu in the toolbar, then select "Save As" from the drop-down menu.

Step 4: In the Save As window, change the file name to *.CMD format. For example, rename the file to "Activator.CMD", then click on the "Save" button.

This will successfully save your Windows 11 Activator TXT file. Alternatively, Windows 11 Activation TXT GitHub is also available for download, where you can directly get the TXT file. However, if Windows Real-time Protection is not turned off, the file will be detected as a threat and will be automatically deleted every time you create one.
Execute Windows 11 Activator Txt
The final step is to execute the Windows 11 Activator TXT file we just created to activate Windows 11.
Step 1: Go to the folder where you saved the file, right-click on it, and select "Run as Administrator" from the context menu to start the Windows 11 activation process.

Step 2: A warning popup will appear—click "Yes" to continue with the activation script.

Step 3: The activator script will execute in Command Prompt, completing the Windows 11 activation.

Step 4: To confirm if Windows 11 is activated, type “Activation” in the search bar and select “See if Windows is activated” to view the activation status.

Once your Windows is activated, you will notice immediate changes—for example, the "Activate Windows" watermark will disappear, and all functionalities will be restored. However, the TXT activator method is no longer recommended. With the latest Microsoft updates, Windows 11 TXT scripts, also known as batch scripts, are now flagged as "HackTool:BAT/AutoKMS". This is because batch scripts are not developed by Microsoft; they simply contain a series of KMS commands written by third parties.
How to Activate Windows 11 with KMS
A more reliable and recommended method for activating Windows 11 is using official KMS (Key Management Service) commands, developed and supported by Microsoft. Rather than relying on a TXT file for activation, KMS is a widely recognized and effective approach, especially with recent updates. It works across all versions of Windows 11, including Home, Pro, and Education. Here’s how you can activate Windows 11 using KMS commands.
Step 1: To begin, open Command Prompt by searching for it in the taskbar's search bar.
Step 2: Run Command Prompt as an administrator by clicking on the "Run as Administrator" option.

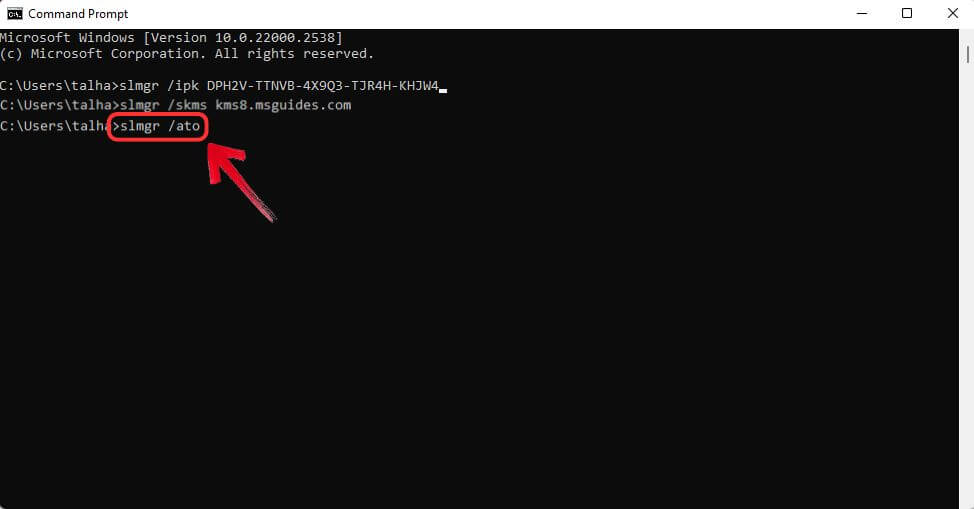
Step 3: To start the activation process, type the following command in Command Prompt, replacing the placeholder with your 25-digit Windows product key to install the Windows 11 license key, and press “Enter”:
slmgr /ipk XXXXX-XXXXX-XXXXX-XXXXX-XXXXX

Step 4: A small pop-up window will appear confirming the successful installation of the product key. Click "OK" to proceed.

Step 5: With the product key registered, connect to a KMS server by entering the following command and press “Enter”:
slmgr /skms kms8.msguides.com

Step 6: Another pop-up will confirm the successful connection to the KMS server. Click "OK" to continue.

Step 7: Finally, activate Windows 11 by entering the following command and pressing “Enter” again:
slmgr /ato
Step 8: A pop-up will notify you of successful activation. Click "OK" to exit.

Step 9: To manually check the activation status, search for “Activation” in the search bar and click on “See if Windows is activated” to view the status.

![Microsoft Office 2016 Activator TXT Command [Free Download]](admin/postimages/0c4e8e0ed1c735f07523832448d0dc78.jpg)

